Category Archives: Valve Amp Designs

Another TV Special amp

A long time ago, I posted the design for an amp on an Australian forum that used valves that were developed for black and white TV service. It has surprised me that there have been nearly 12,000 views of the TV Special thread. Perhaps the interest in this amp has been fueled by large collections of old TV valves that have little use beyond their original application in TV service. The fact is that by far and away the largest consumption of valves (vacuum tubes) in history has been in consumer electronics – TV, Radio and record players. This has resulted in many valves used and NOS still being available very cheaply on Ebay and other online sellers.

My TV special amp used combination valves developed for video amplifier/sync separator application in B/W TVs. In addition, the TV Special also used a 6BX6 TV IF amplifier valve in the preamp. My Gilly amplifiers took advantage of another cheap TV valve – the 6GV8, which was used in the vertical deflection section of a TV set. The reality is that a valve is a valve, and beyond application in TV or Radio service, any valve can be used for other applications as long as their characteristics are suitable. It might surprise some to discover that the well regarded 6V6 power valve was used also as a vertical amplifier in TV sets. My own collection of TV valves continues to grow due to bargain purchases on Ebay, Amateur Radio Hamfest bargain buys and shed clearances. As a result, I thought I’d develop another “TV Special” amp.

As I was keen to make this a “junk box” build, I first decided to use my tried and proven 50W downlight transformer as an output transformer as I have heaps of them here. Having made this choice, the design then became a simple 5W single ended amp. As the output transformer reflects a 3.2K load to the output valve, I looked through my valve collection and datasheets to find a TV valve that is suitable for driving this lower impedance load.
A suitable candidate is the EL86/PL84. This is a similar valve to the EL84 and was developed to deliver more power with a lower HT supply. It was used in sound output and vertical output application in TV sets. The PL84 is the series heater version of the EL86.

Here is a page from the PL84 datasheet. You can see that this valve is ideal for the planned amp to drive a 3.2K load 

The parts for this amp now began to be gathered 

Having settled on an EL86/PL84 TV valve for the output stage, I was keen to continue the TV theme with a preamp valve that was also developed for TV service. In addition, I wanted to use series heater valves for this build as they simplify a power supply build. Series heater valves were developed for TV use in Europe and the US. Instead of the more familiar arrangement of 6.3V heater valves sharing a common heater voltage (6.3V), series heater valves shared a common heater current (typically 300mA). The valve heaters were designed with “controlled warmup” – meaning that they all came up to operating temperature at the same time and so balanced the heater currents.

So having selected a PL84 series heater output valve, I chose a PCF802 preamp valve. The two heaters in series could be supplied from a 24V transformer winding. The PCF802 was developed for low hum and microphony for TV line oscillators and so is ideal for the preamp in a guitar amp. Details here: http://www.r-type.org/addtext/add124.htm

Here is the schematic for the power supply for this new amp:

One power transformer does double duty to generate the HT for the amp and also provides power for the valve heaters.
An old Australian made A&R 240 to 48V C.T. transformer feeds a voltage quadrupler to generate around 250V DC HT. As mentioned the PL84 and PCF802 are “series heater” valves sharing the same current rating of 300mA. In this amp the two heaters in series require a total of 24 volts which is taken from the “cold” side of the multiplier input and the transformer centre tap. The PCF802 preamp valve heater is connected to the cold side of the multiplier input to minimise hum induction. This means that the valve heaters “float” at 1/2 HT (about +125V DC) but this is well within their max 200V heater to cathode voltage rating. A bonus of the valve heaters being elevated at a higher voltage than the cathodes is that hum is also minimised.

Here is the finished amp:

There is certainly not much to it – a couple of valves and transformers and one volume control. I have been pleased with the result – approximately 5W of output from the PL84. The one thing that stands out is how quiet the amp is – the amp is dead quiet until the volume is fully advanced and only then a small amount of hiss. This has probably been the quietest amp I have developed. I think this is due to the largish 470uf caps in the power supply but mostly due to the elevated valve heaters. Certainly not bad for a single ended amp as they lack the inherent hum rejection of a push pull amp.
As far as tone goes it sounds quite authoritative for its 5W of power with a strong mid range and rather nice overdrive when fully driven.

Here is the schematic for the amp:
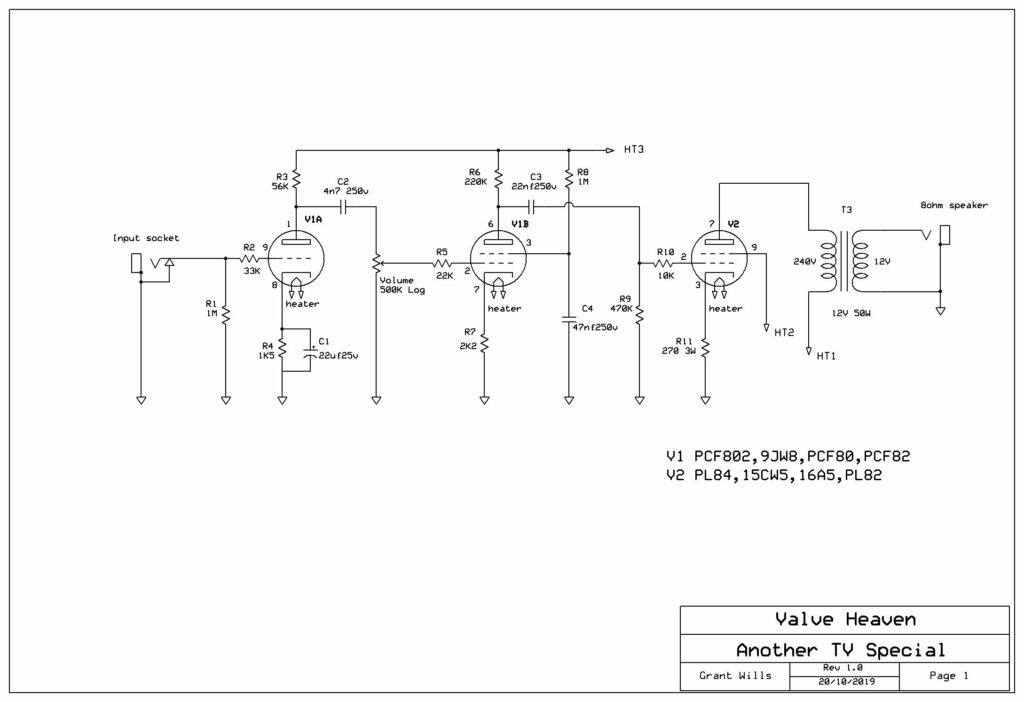
The PL84 in the output stage can be seen driving the halogen output transformer. The preamp uses the PCF802 triode/pentode as mentioned. I have also listed several other valves that can be substituted for the PL84 and PCF802. The PL82 (16A5) can be used in place of the PL84 and a PCF80 (9U8) for the PCF802. I decided to use a preamp arrangement using the triode section of the 6U8 triode/pentode valve essentially as a lower gain booster driving the pentode section which provides most of the amp gain. Both the pentode stage and the output valve have no cathode bypass capacitors and it is suggested that this helps shape the overdriven tone . Having said all that, it is certainly a very simple amp with quite an amount of output power and great tone – a good outcome from some old TV valves 

Here is the amp underside – again, not much to it. The quadrupler voltage multiplier and components clustered around the two valve sockets.

An in depth review of the Lamington amp series

I recently received this in depth review from Colin P who has built just about all of my Lamington amp designs!

It makes an interesting read as Colin has learnt a great deal about valve amps along the journey of building Lamington amps.

Hope you find it interesting as well!

“First Lamington build: 18W
As a first build the Lamington 18 watt amp is not something you want to be attempting with no help at all, especially if you have no experience with valve amps construction. I tried using only the schematic as a guide, and three knock-down re-builds later I bought the construction manual from Grant – So I can honestly say this is money well spent.

Although the finished amp has a little background hum (because of my sub-optimal tube placement) the result of following the manual’s wiring practices is a great clean sounding amp with loads of headroom and excellent overdrive tones. I opted for the 5/15 switch and it’s loud through a 1×12 cab with a Celestion vintage 30 – even at half volume on 5 watts. Tone control is smooth, and with the gain up high this amp is a screamer that compares very well to some of the big brands at a fraction of the cost.

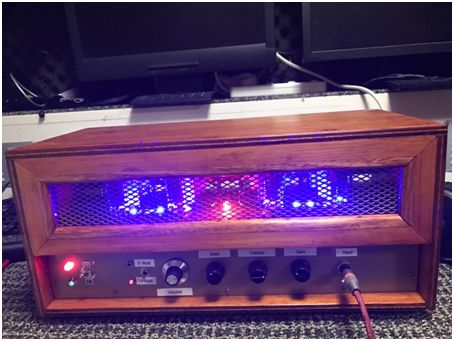
I built the chassis in to a 9mm marine ply box using GutterGuard for the front grille, added red and green pilot lights to show the 5w and 10w options and added a blue LED strip for some bling.
I also had a local machine shop knock up the chassis out of a sheet of 1.5mm aluminium so it’s not a true Lamington because I didn’t source the chassis from K-Mart – And 150 coats of shellac always looks good on a decent slice of timber – Here’s a photo.:

colin-lamington

Next Lamington build: Lamington Junior (2w)
I already had two Lamington amps done, and was looking for something smaller to use in my 3×3 music room when I saw the Lamington Junior design which became the subject of my 3rd Lamington build.

For this project I chose Grant’s point-to-point methodology which is much lower in cost, and it went without saying that I bought the build guide- Just to make sure everything was done right.
For the chassis I used a spare piece of 1.5mm aluminium sheet the same size as an A4 page, with a couple of extra pieces pop-riveted on to make the front and back panels – So it’s not strictly a true Lamington Junior either, but I will take the hit on that one..
Although it is a small amp it is also surprisingly loud, and sounds great through both my 1X12 Eminence and Celestion cabs. Tone control is also very precise, and cranked up this amp sounds fantastic with my Les Paul and my Strat. It’s a bit small for gigs but it’s an excellent practice and studio amp and it’s easy to build – even if you do the metalwork from scratch like I did.
This one has the power switch to drop the output to 1w – and from my experience there is not a whole lot of difference – They are both loud…

After construction and checking of all the wiring, component values etc the amp came up first time with no issues and I can honestly associate that with Grant’s build guide which is very easy to work with.
In case I haven’t said it before: “Be sure to buy the build guide” – It’s money well spent and it takes the hassle factor out of the equation when you are trying to figure out why things are not working, especially if you are new to tube amp construction..

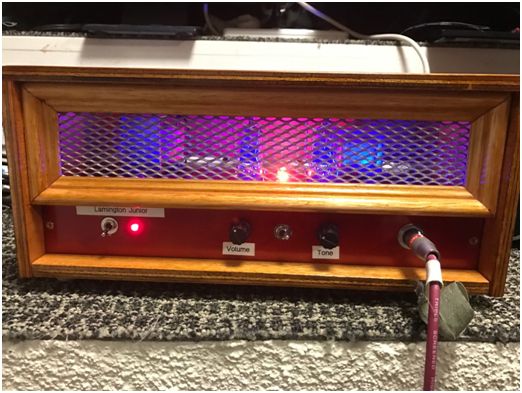
Here is my Lamington Junior – Bling and all…

colin-lamington-jnr
Another Lamington build: Lamington Lite (10w)
I knew I was going to enjoy the Junior but I also wanted something a little larger that I could use for small gatherings where a PA was not necessary, so I started a Lamington Lite build just as I was finishing off the Junior. Using the same point-to-point technique as Grant’s other designs this amp also worked off the bat and I have to say that it has become one of my all-time favorites.
It is simple to set up, the big clean tones are magical, and the overdriven sound is way too good for an amp that costs just a couple of hundred dollars to build. I bought a second set of tubes just in case, so if anyone has spare pair of Halogen transformers I want them !!

The chassis is made out of another piece of scrap aluminium with sides riveted on, and the halogen transformers came out of a friend’s roof – So it cost almost nothing to construct, and it’s not much bigger than the junior.

The thing I like most about this amp is the clean headroom which is crystal clear– it needs to be well up on the volume dial before it starts to break up so if you are looking for a great little amp that doesn’t cost a bomb this is the one to go for.

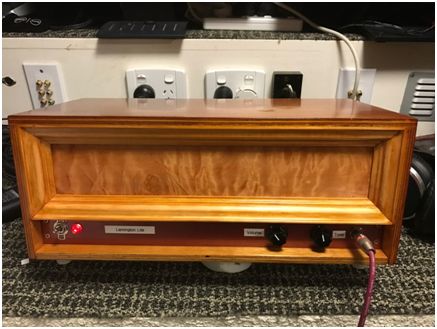
I also built mine in to a marine ply box with a billion coats of shellac for a mirror finish (about standard these days), but with this one I opted for a quilted maple veneer on the front panel instead of the LED bling. There is also a panel on the back but I have allowed for airflow so it does not get too hot inside..

colin-lamington-lite

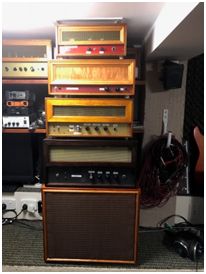
For reference here’s a gaggle of Lamingtons  on top of an Eminence Legend 1×12″

colin-lamingtons

The Lamington Reverb – a better valve reverb unit

I have been kicking around the idea of a “Lamington” stand alone spring reverb unit for a while, and recently began a build.
The inspiration for the design came from a Channel Road Amplification tech paper found here: http://www.channelroadamps.com/articles/reverb_driver/

Driving a reverb spring tank presents some challenges. The commonly used driver circuit drives a low impedance tank via a small transformer. While this works, it provides constant voltage drive which is not the best way to drive a spring tank. It results in poor high frequency response due to the inductive nature of the drive coil. A much better way to drive a tank is with a constant current drive circuit. This results in a wide band response from the tank.

Inspired by the Channel Road paper, I looked at building a stand alone reverb unit. Using a high impedance tank and a constant current pentode driver that eliminates the drive transformer, it is possible to build a simpler (and superior) spring reverb unit . In addition, a plugpack power supply similar to the one used in the Lamington Junior amp can be used to simplify the power supply and make it a cheap build.

More details to come!

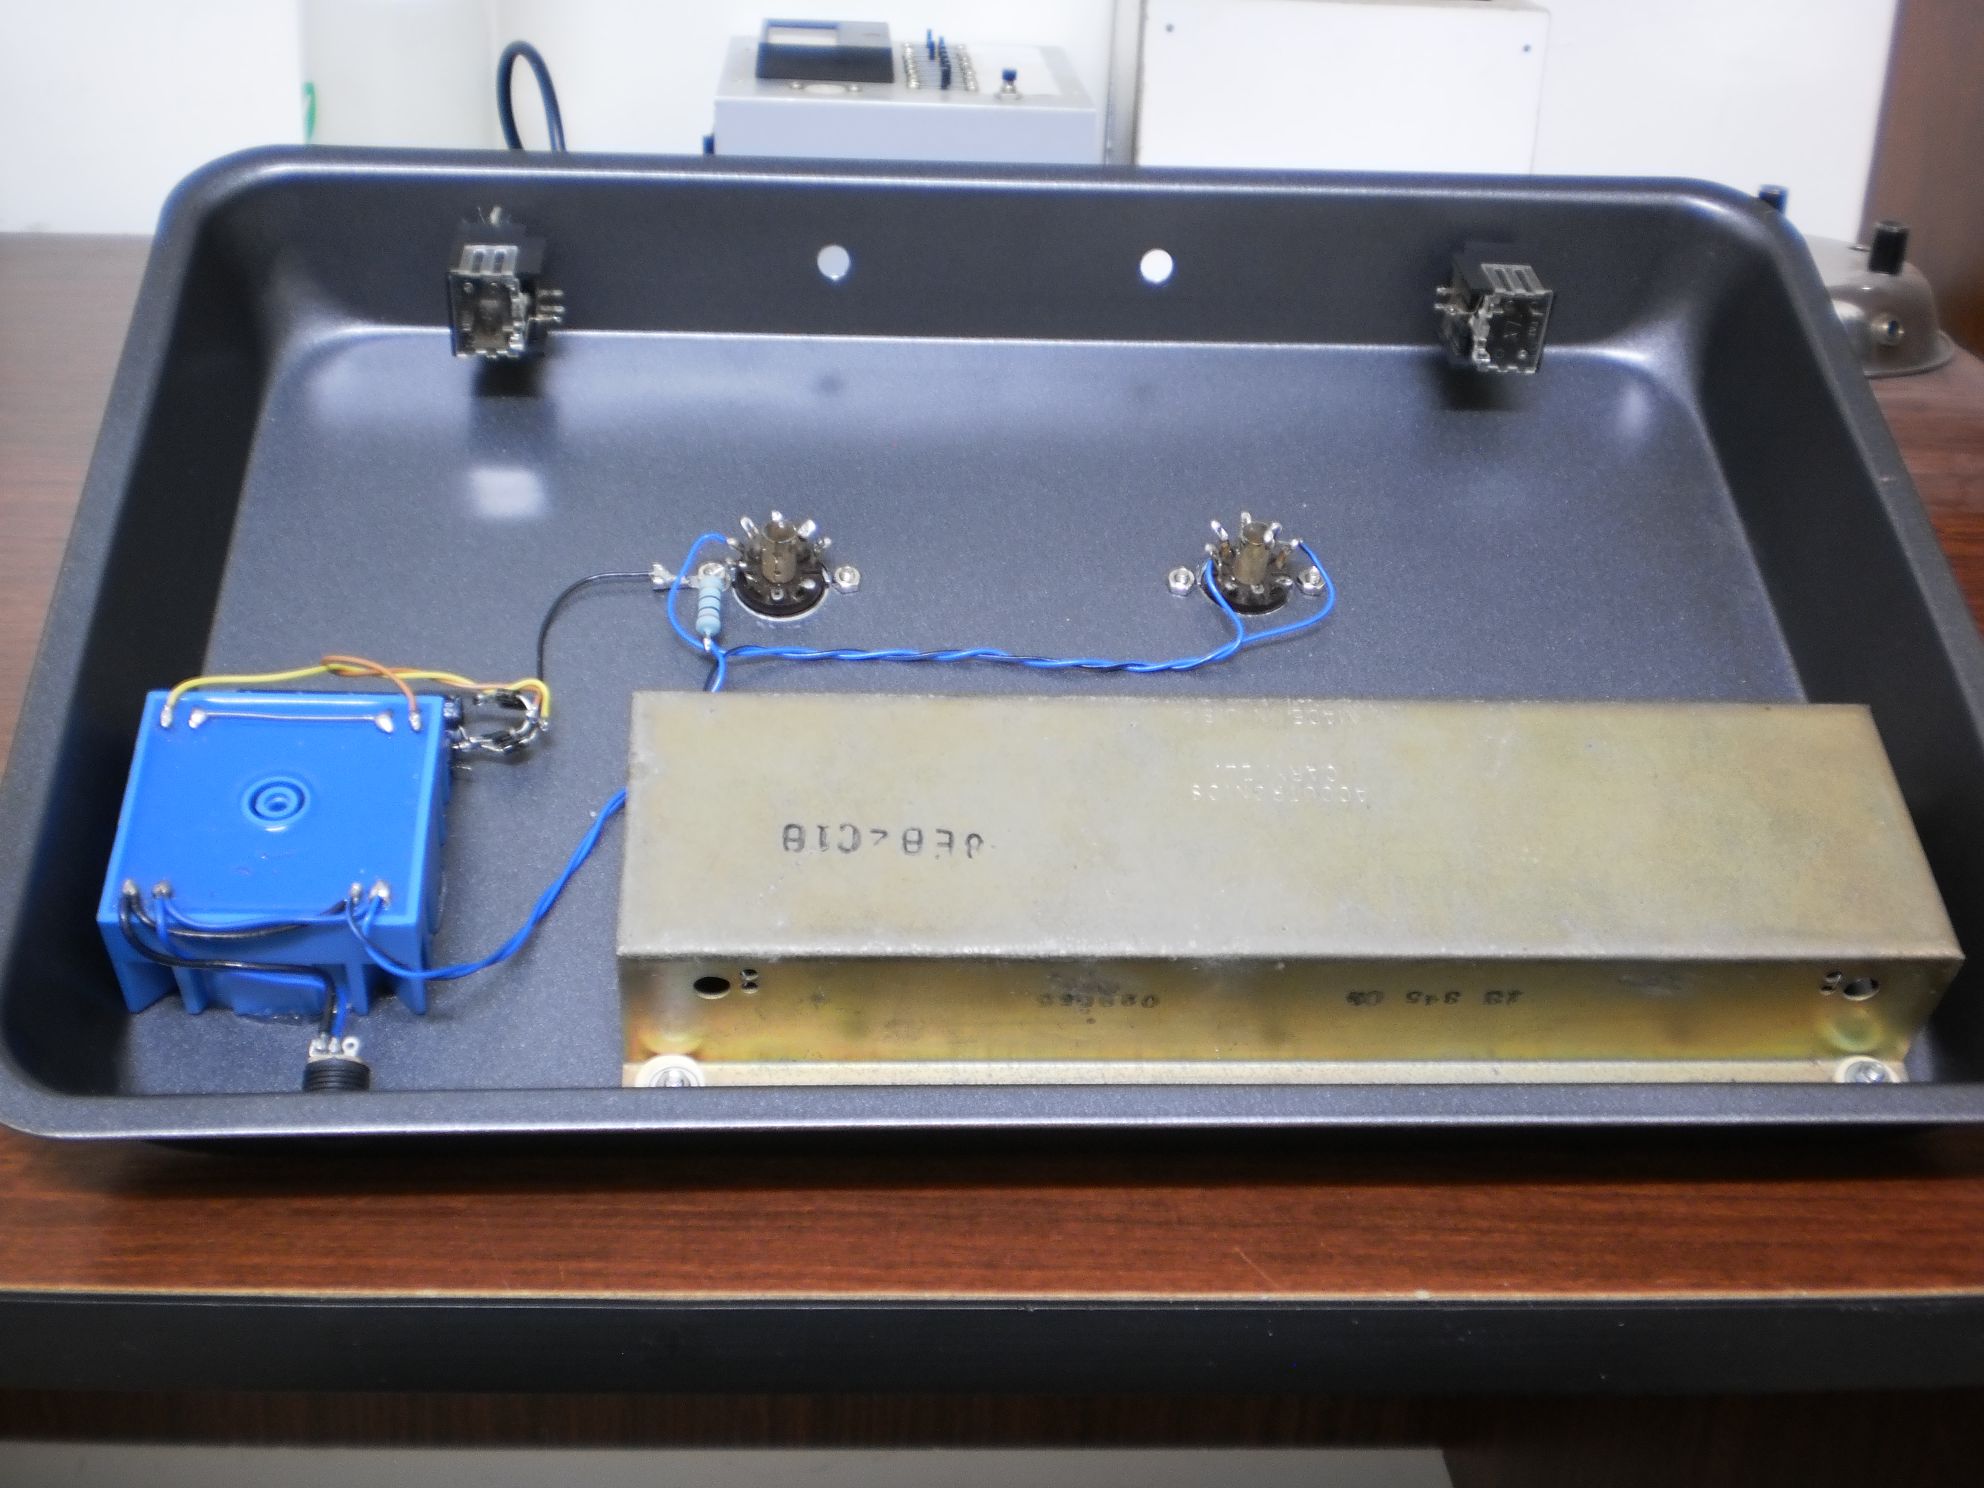
Some progress – the chassis was prepared with holes for the controls, valves and spring tank. As mentioned, a 12V plugpack supplies power to the valve heaters and a toroidal transformer steps up the 12V AC to generate the HT for the valves.

An Accutronics 8EB2C1B spring tank was at hand and is ideal for this build with an 800 ohm drive impedance. These tanks are readily available as a spare for the Fender Blues Junior amp both here in Australia and O/S.

lr-1lr-2

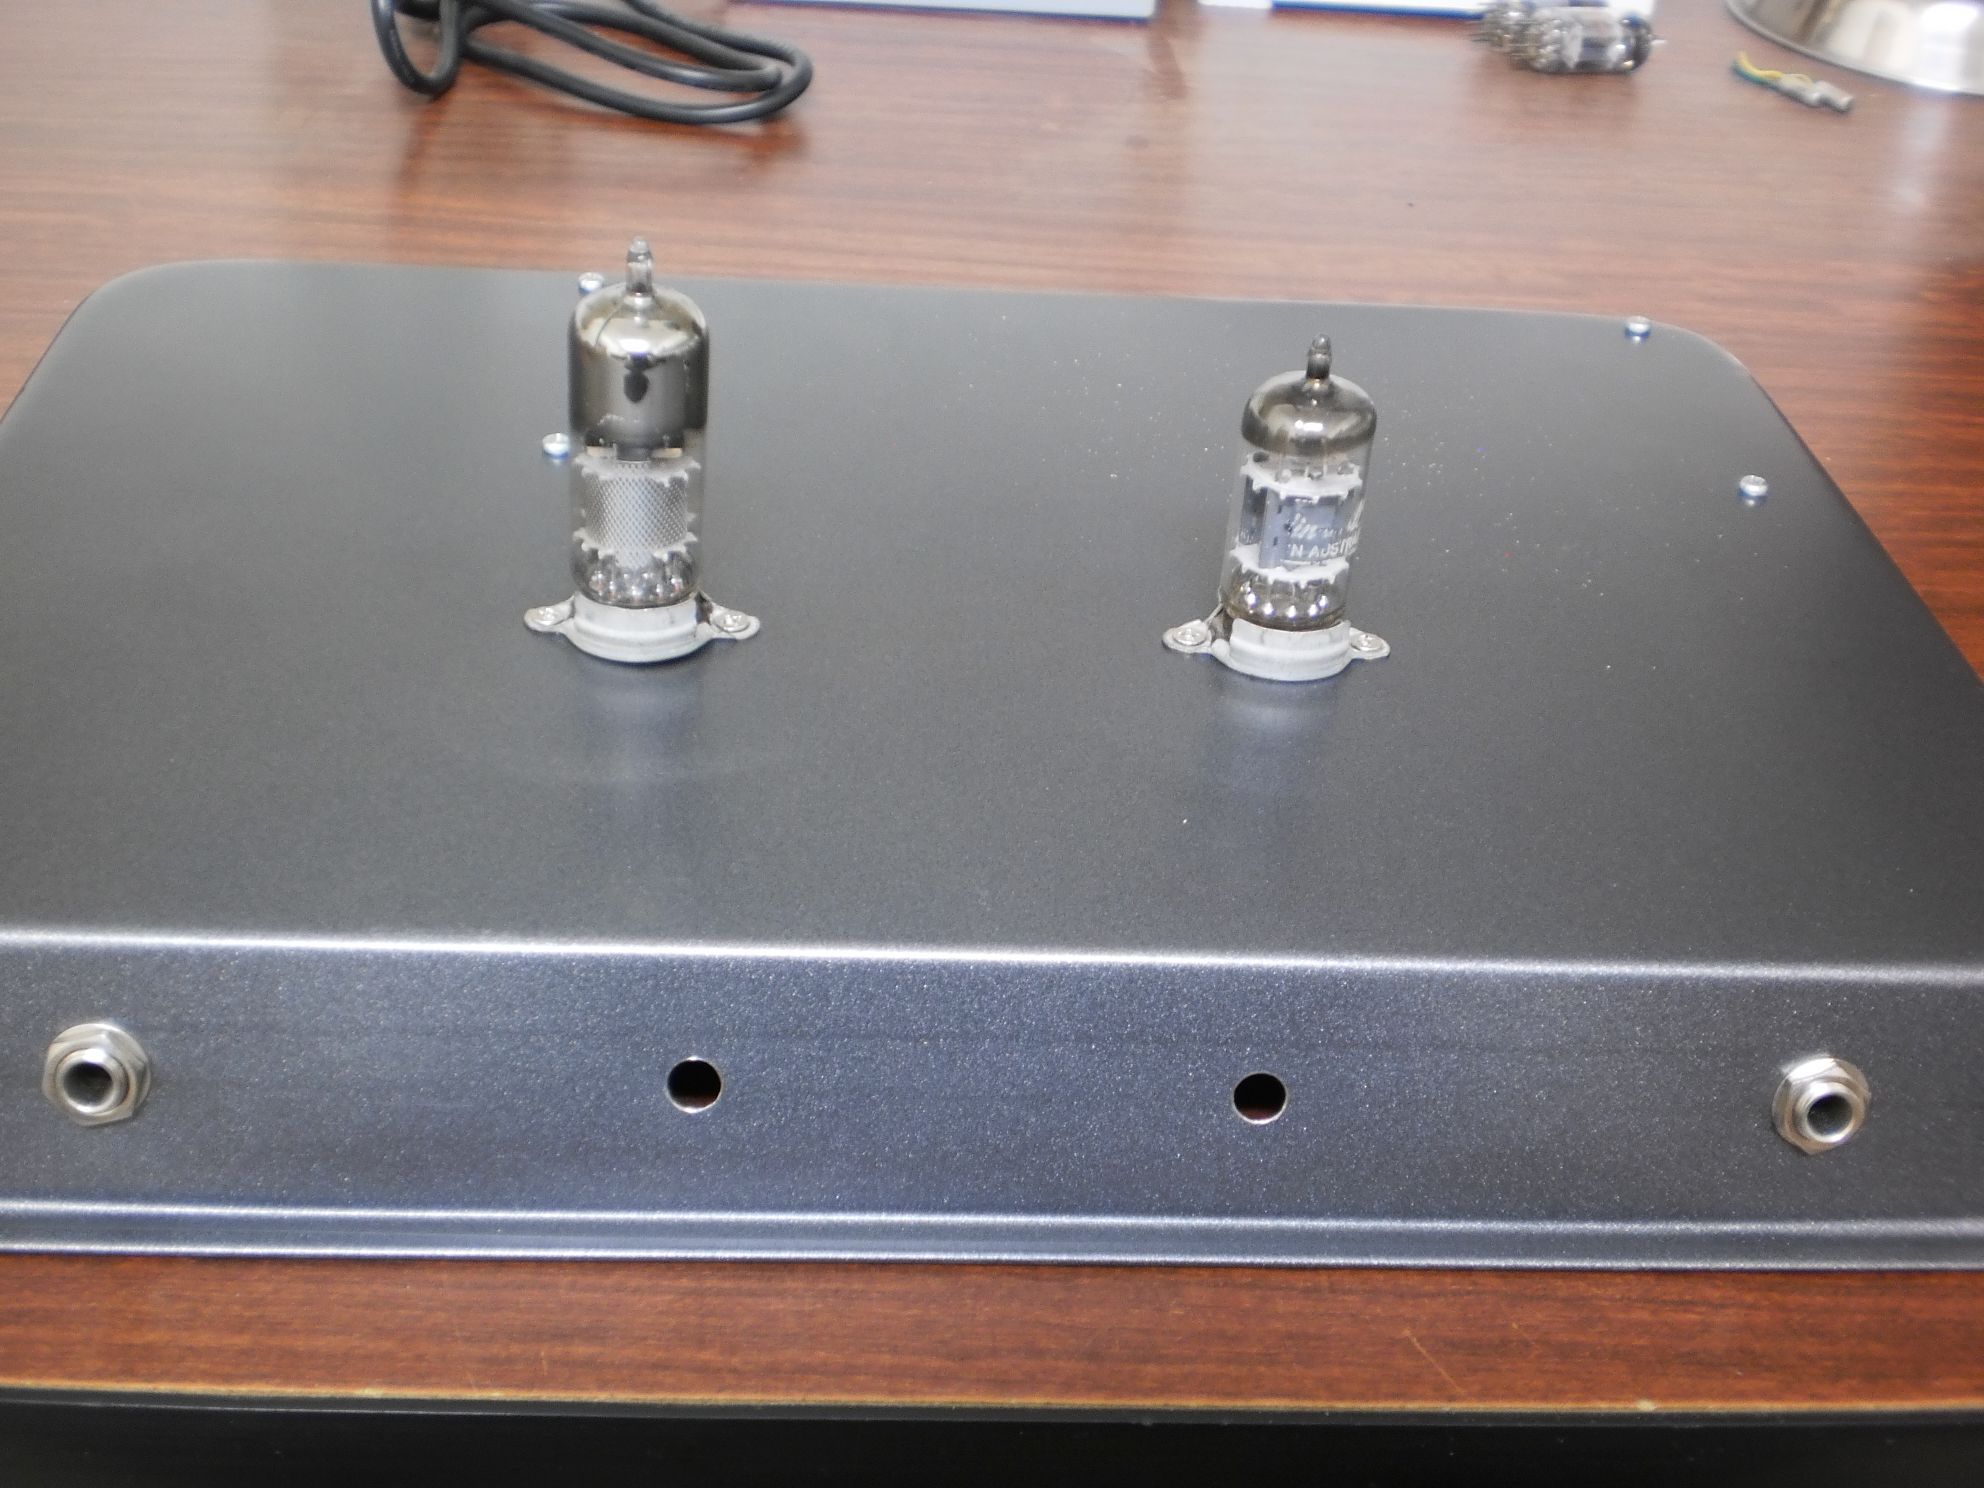
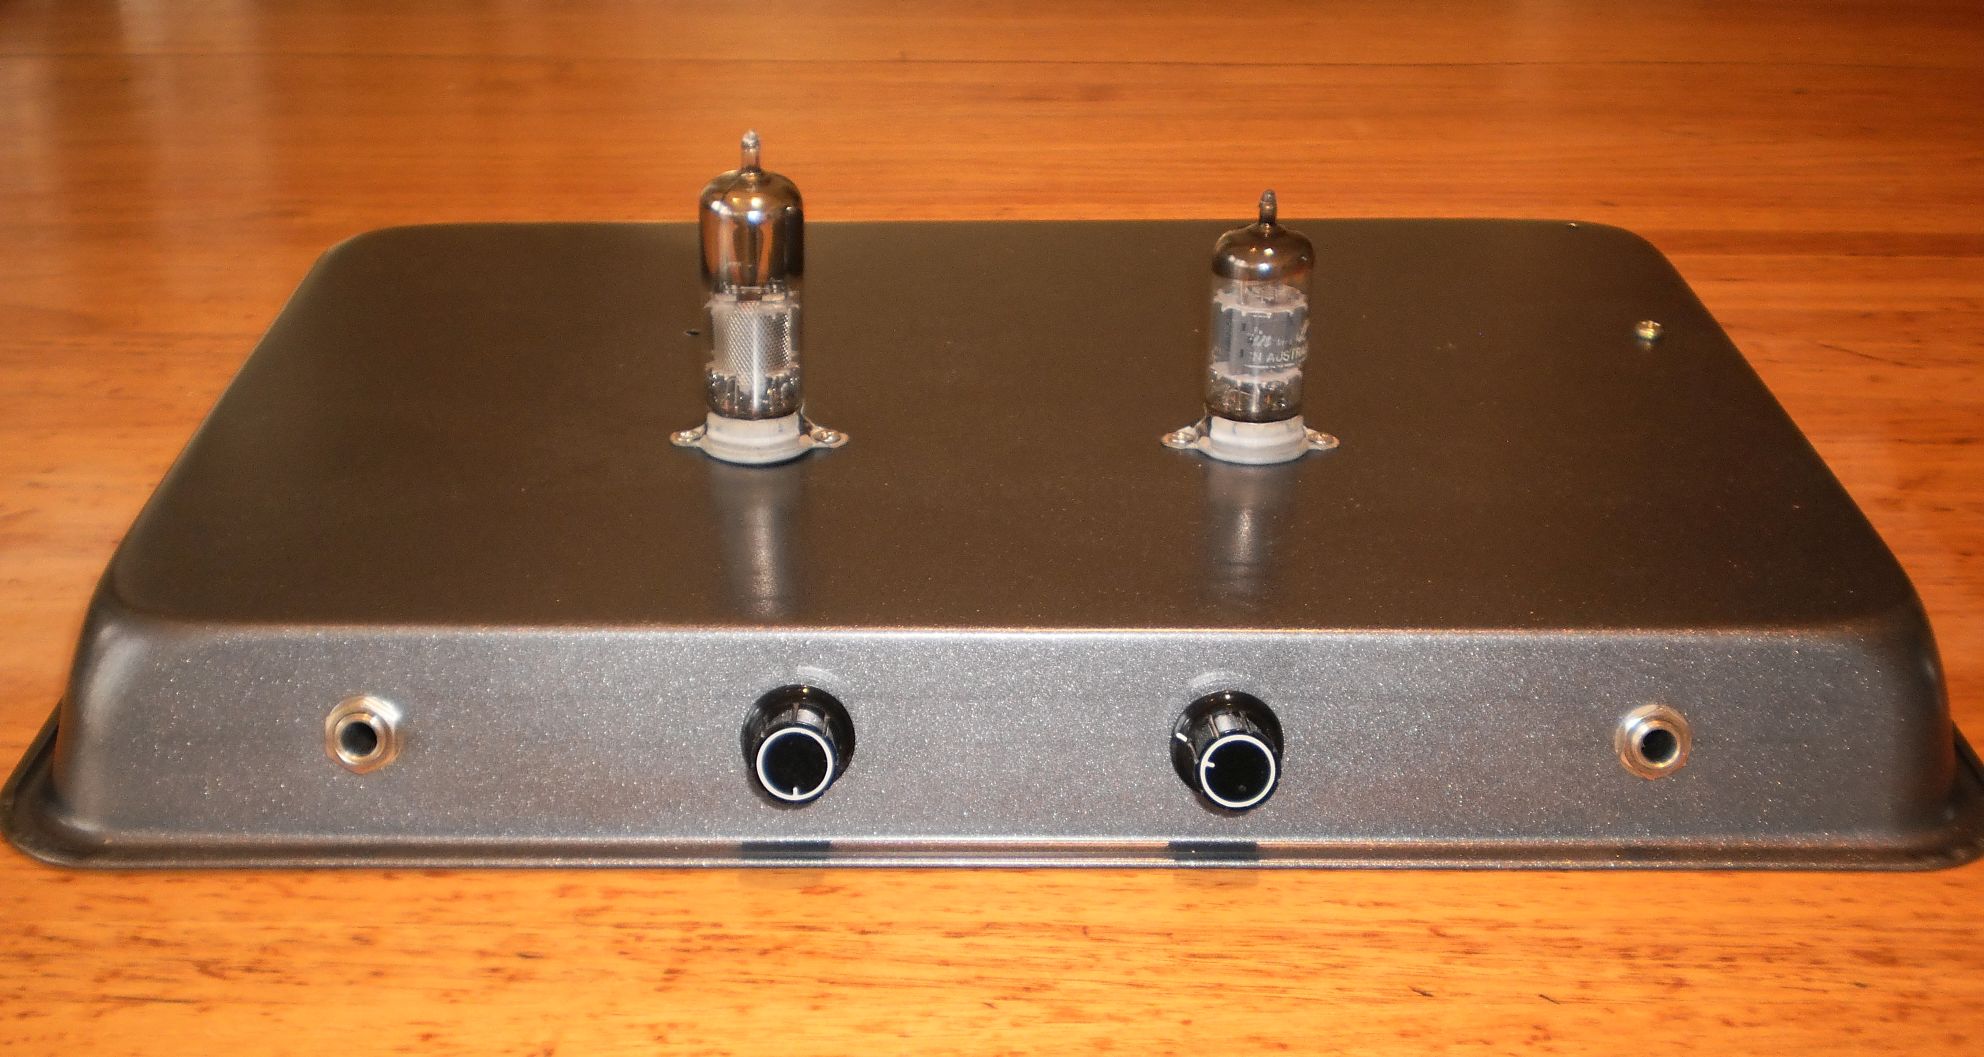
Have now completed the Lamington Reverb and pretty happy with it.  Firstly, a photo of the finished reverb unit.
From left to right: input, dwell, mix controls and output.
Also visible is the 6BX6 tank drive valve and a 12AX7 preamp and recovery valve.

lr-3

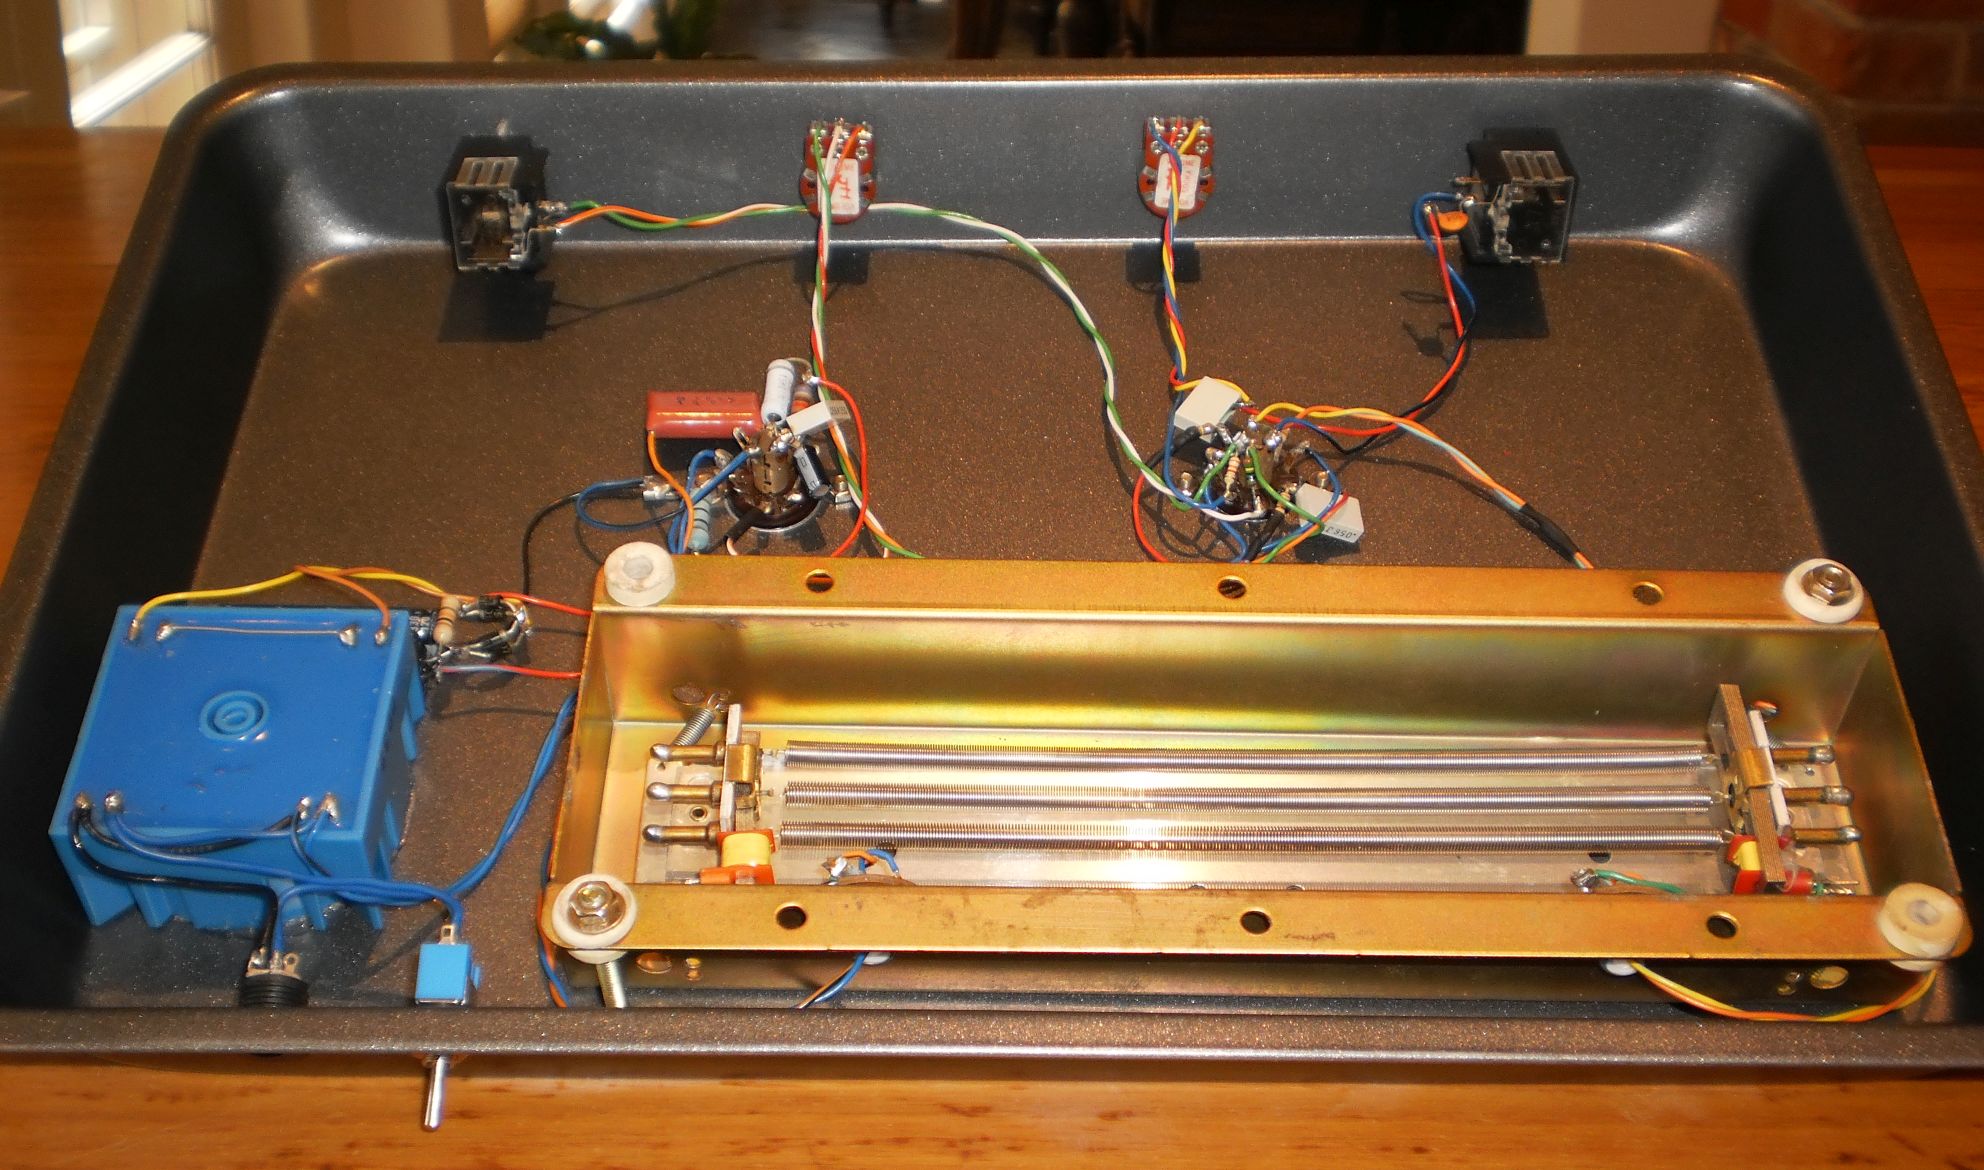
And an underside photo. Not a lot to it – a 12V to 240V toroidal transformer, the reverb tank, and some components clustered around the valve sockets. You can click on the image for more detail.

lr-4

Here is the schematic for the Lamington Reverb. You can click on the image for more detail.

the-lamington-reverb

It is a simple circuit, but works well.

The input signal is fed to the first gain stage with the dry signal fed straight to the MIX control from the cathode. This first stage drives the current source pentode via the DWELL control. This determines how hard the tank is driven and changes the reverb tone as a result. As discussed, the tank drive circuit is taken from the Channel Road paper and provides current drive directly to the tank eliminating a drive transformer. The tank used in the prototype is an Accutronics 8EB2C1B which is used in the Fender Blues Jnr and is readily available here in Australia and overseas. Its drive coil impedance is 800ohm and is ideal for the constant current driver which is a commonly available 6BX6 (EF80). The output of the spring tank is fed to the other half of the 12AX7 input triode and the output of this valve is fed to the mix control and output socket.

The power supply is a simple arrangement using a 12V 1A plugpack which feeds the heaters and a second transformer which steps up the 12V to a high voltage for the valve HT.

Some construction details to come.

Some comments on constructing the Lamington Reverb.

In building a spring reverb unit, it is very easy to couple unwanted mains magnetic fields into the tank pickup coil causing hum in the finished unit. My approach to have a hum free unit was to use a toroidal step up transformer which has less external magnetic field than an ordinary EI lamination transformer. Also, I positioned the tank with the pickup coil at the other end of the chassis from the transformer. In addition, I found if I inverted the tank further hum reduction occurred.
If you are using an EI step up transformer, I suggest waiting before mounting it. With some extension leads on the transformer, move it around to find the position that induces the least amount of hum and mount it there.
You may note that I have used fairly large values of HT filter caps for the prototype. This was necessary to eliminate any HT hum from being introduced into the unit.Re suitable valves for the Lamington Reverb, the 12AX7 is readily available. The 6BX6 is no longer manufactured, but was used by the squillions in the day in B/W TV sets. It can be substituted with about any RF pentode such as the 6AU6, 6EJ7, 6ET6, 6CB6, EF94 etc
The Accutronics 8EB2C1B reverb tank is readily available from Evatco here in Australia or from Ebay. You may wish to use a longer tank which would work fine in this unit as long as it has a high impedance (600 or 800ohm) drive coil.Re the transformers, the plugpack is a 240V to 12V1A AC unit. The stepup transformer I used is a 10VA 240V to 12V toroidal transformer wired backwards. Just about any low power 240V to 12V transformer could be used – just check its location with respect to the reverb tank as mentioned to minimise hum.

So overall, I have been very happy with the Lamington Reverb – it sounds very lush with no unwanted noise and hum. The ability to vary the drive to the tank with the dwell control is an added bonus to change the character of the reverb tone.

A 6CM5 hi-fi amplifier

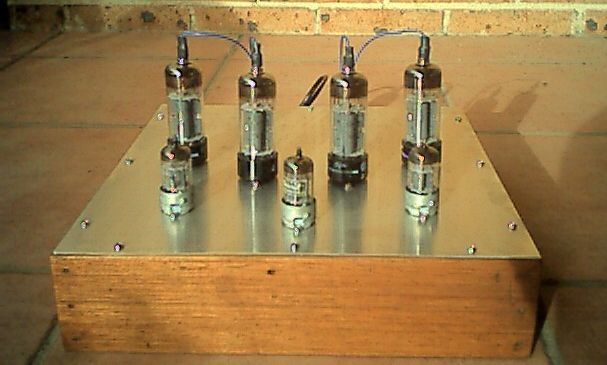
I regularly receive emails with questions about a Hi-Fi valve amplifier design I developed many years ago. The design has been posted on a few websites and I thought it would be a good idea to re-post it here and to add some updated information.6CM5 amp3

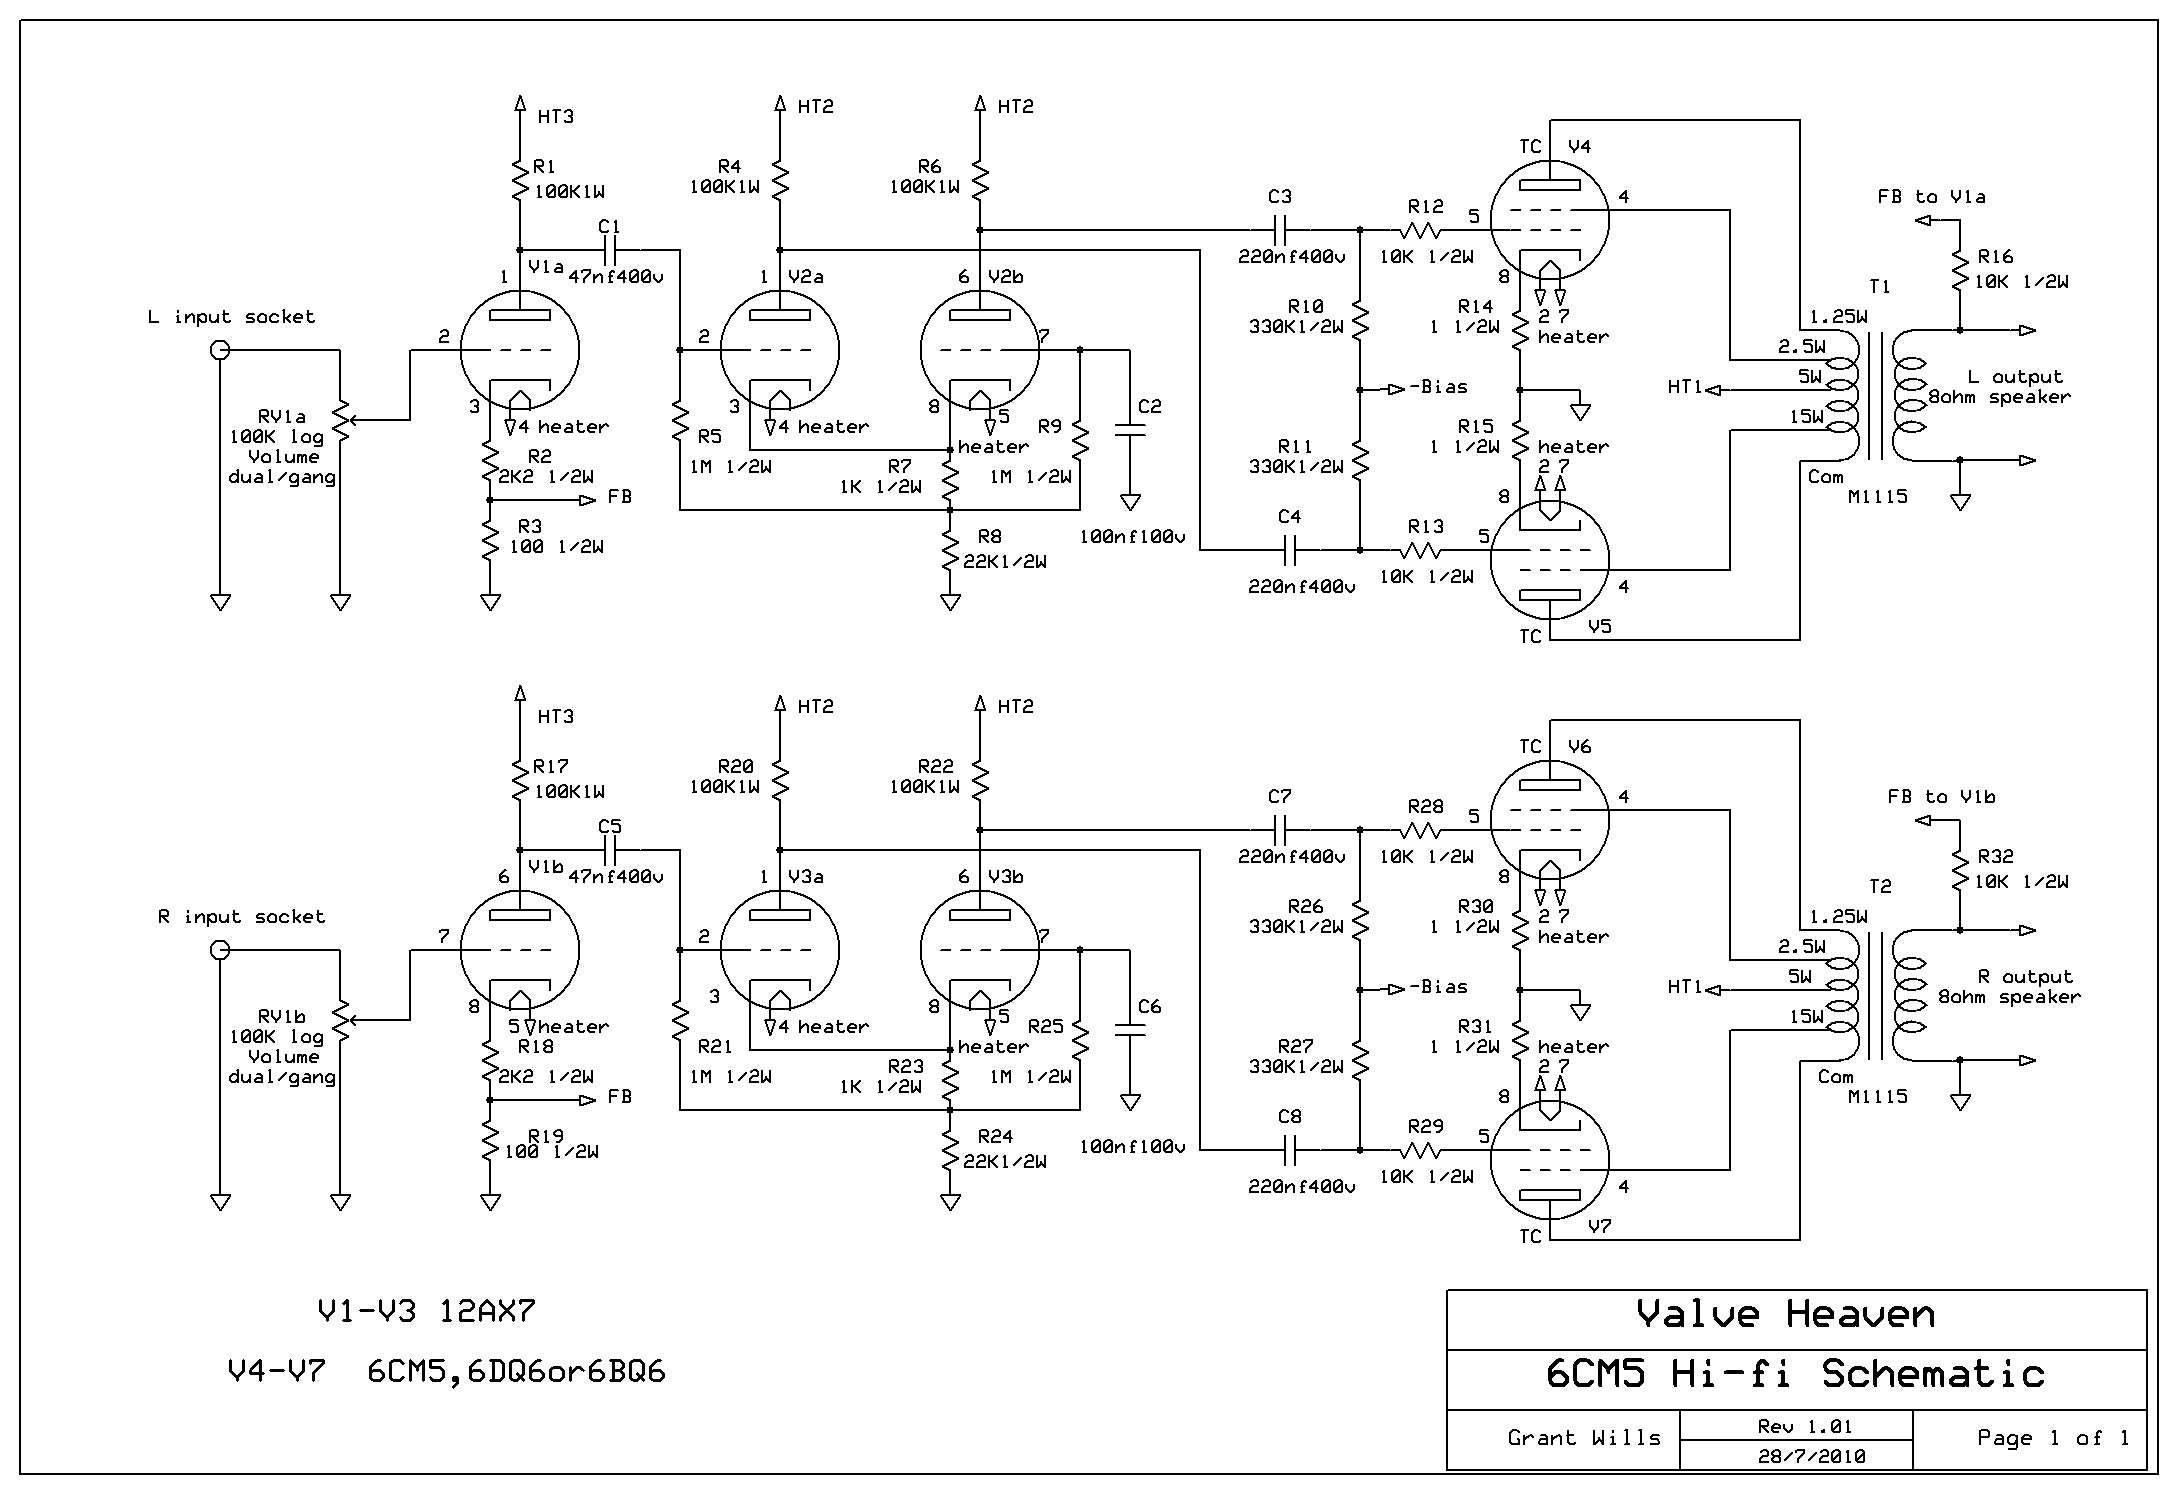
Here is the schematic for the amplifier – click on it for full size.6CM5 Hi-fi Schematic

And here is the text that accompanied the original design:

“This is a design for my 15W/channel ultralinear hi-fi stereo amplifier. The front end of the circuit is conventional. The Mullard 5-10 amplifier uses the same phase splitter as I have, and the text refers to it as “a cathode-coupled phase splitter”. The output stage initially used 6L6 valves with a supply of 300V as again I had some on hand, but after quite a bit of experimentation with other output valves I landed on 6CM5 valves. 

As is well known, they are an odd valve to be used for audio applications, and I had several unsuccessful attempts to use them. I thought initially that I’d feed the screens with 1/2 B+ as that is how data sheets suggest you should do (and incidentally how similar line output valves such as 6DQ6 are configured in old guitar amplifiers). However, any attempt to use them in this way caused fairly violent oscillation at ultrasonic frequencies. In addition, I wanted to use them in ultralinear configuration and tying the screens at 1/2 supply did not permit this. The ratings indicate a maximum screen supply of 200v and so I hesitated to use the ultralinear mode. However, after trying several configurations which either oscillated, distorted or otherwise misbehaved, I tried them in ultralinear mode with a fairly high amount of bias (-50v), and they worked really well. They were by far the most linear of any valve I tried and worked well with a fairly low standing current (approx 25ma each) and put out the maximum power (17w). This seemed to justify their rather high heater power requirement. So it seems that it is fine to run these valves with higher screen voltages.

The power supply used an old Philips valve power transformer which was up to the fairly high heater current load (4x 1.25A + 3x .3A = 5.9A) and had a ht winding of 110v which applied to a voltage doubler provided 300v HT. I decided to use fixed bias as it allows higher plate to cathode voltage for the output valves than cathode bias. The technique of getting a negative bias voltage from a voltage doubler is an old trick from guitar amplifier designs. I added a 10 ohm resistor in each 6CM5 cathode earth return to monitor cathode current and act as a fuse under overload conditions. Note that the circuit doesn’t have any provision for individual adjustment of output valve standing currents. This was because I used 4 Radiotron 6CM5’s from the same batch with very similar characteristics. A couple of other 6CM5’s that I tried varied a bit in standing current. It may be helpful to modify the bias supply with 4 x 50K trimpots in parallel and then in series with an 82kOhm resistor to ground across the bias supply in place of the one 100kOhm trimpot. With each trimpot wiper independently feeding each output valve this arrangement could then provide individual bias control over each valve. If the bias voltage needs to be increased, the value of the 220nF capacitor feeding the bias rectifier can be increased.

Construction was fairly easy as I took a leaf out of many current hi-fi amp designs. I simply made up a square plinth of timber which has a 12 by 12 inch aluminium sheet (from Dick Smith or Jaycar) fixed to the top. Easy to make and it makes a great furniture piece. I checked the frequency response figures – the amp has a wide frequency response with sustained bass and sounded very nice indeed – even my wife immediately noticed a dramatic difference in sound to our existing solid-state hi-fi amplifier. The S/N ratio for this amp was outstanding – maybe the C-core power transformer, or the star earthing, or the provision of a centre-tap on the heater winding, or my 100µF overkill filter capacitors on the small signal HT? The noise and hum are just about inaudible listening directly to the drivers of my quite sensitive speakers – certainly better than other amplifiers I have used over the years, and pretty amazing for a valve amp! Overall, a lot of fun to build, and a most satisfactory result.

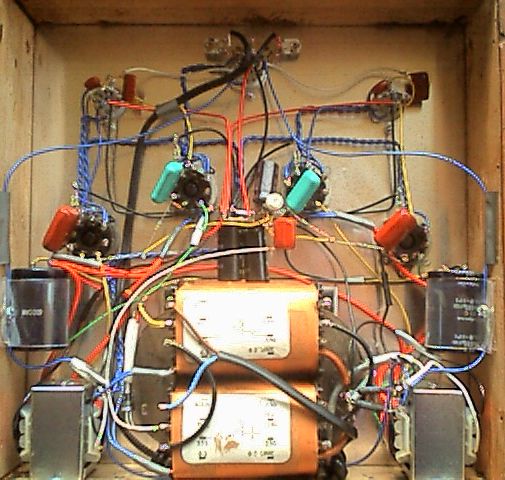
Here is an underside image of the original design:Construction2

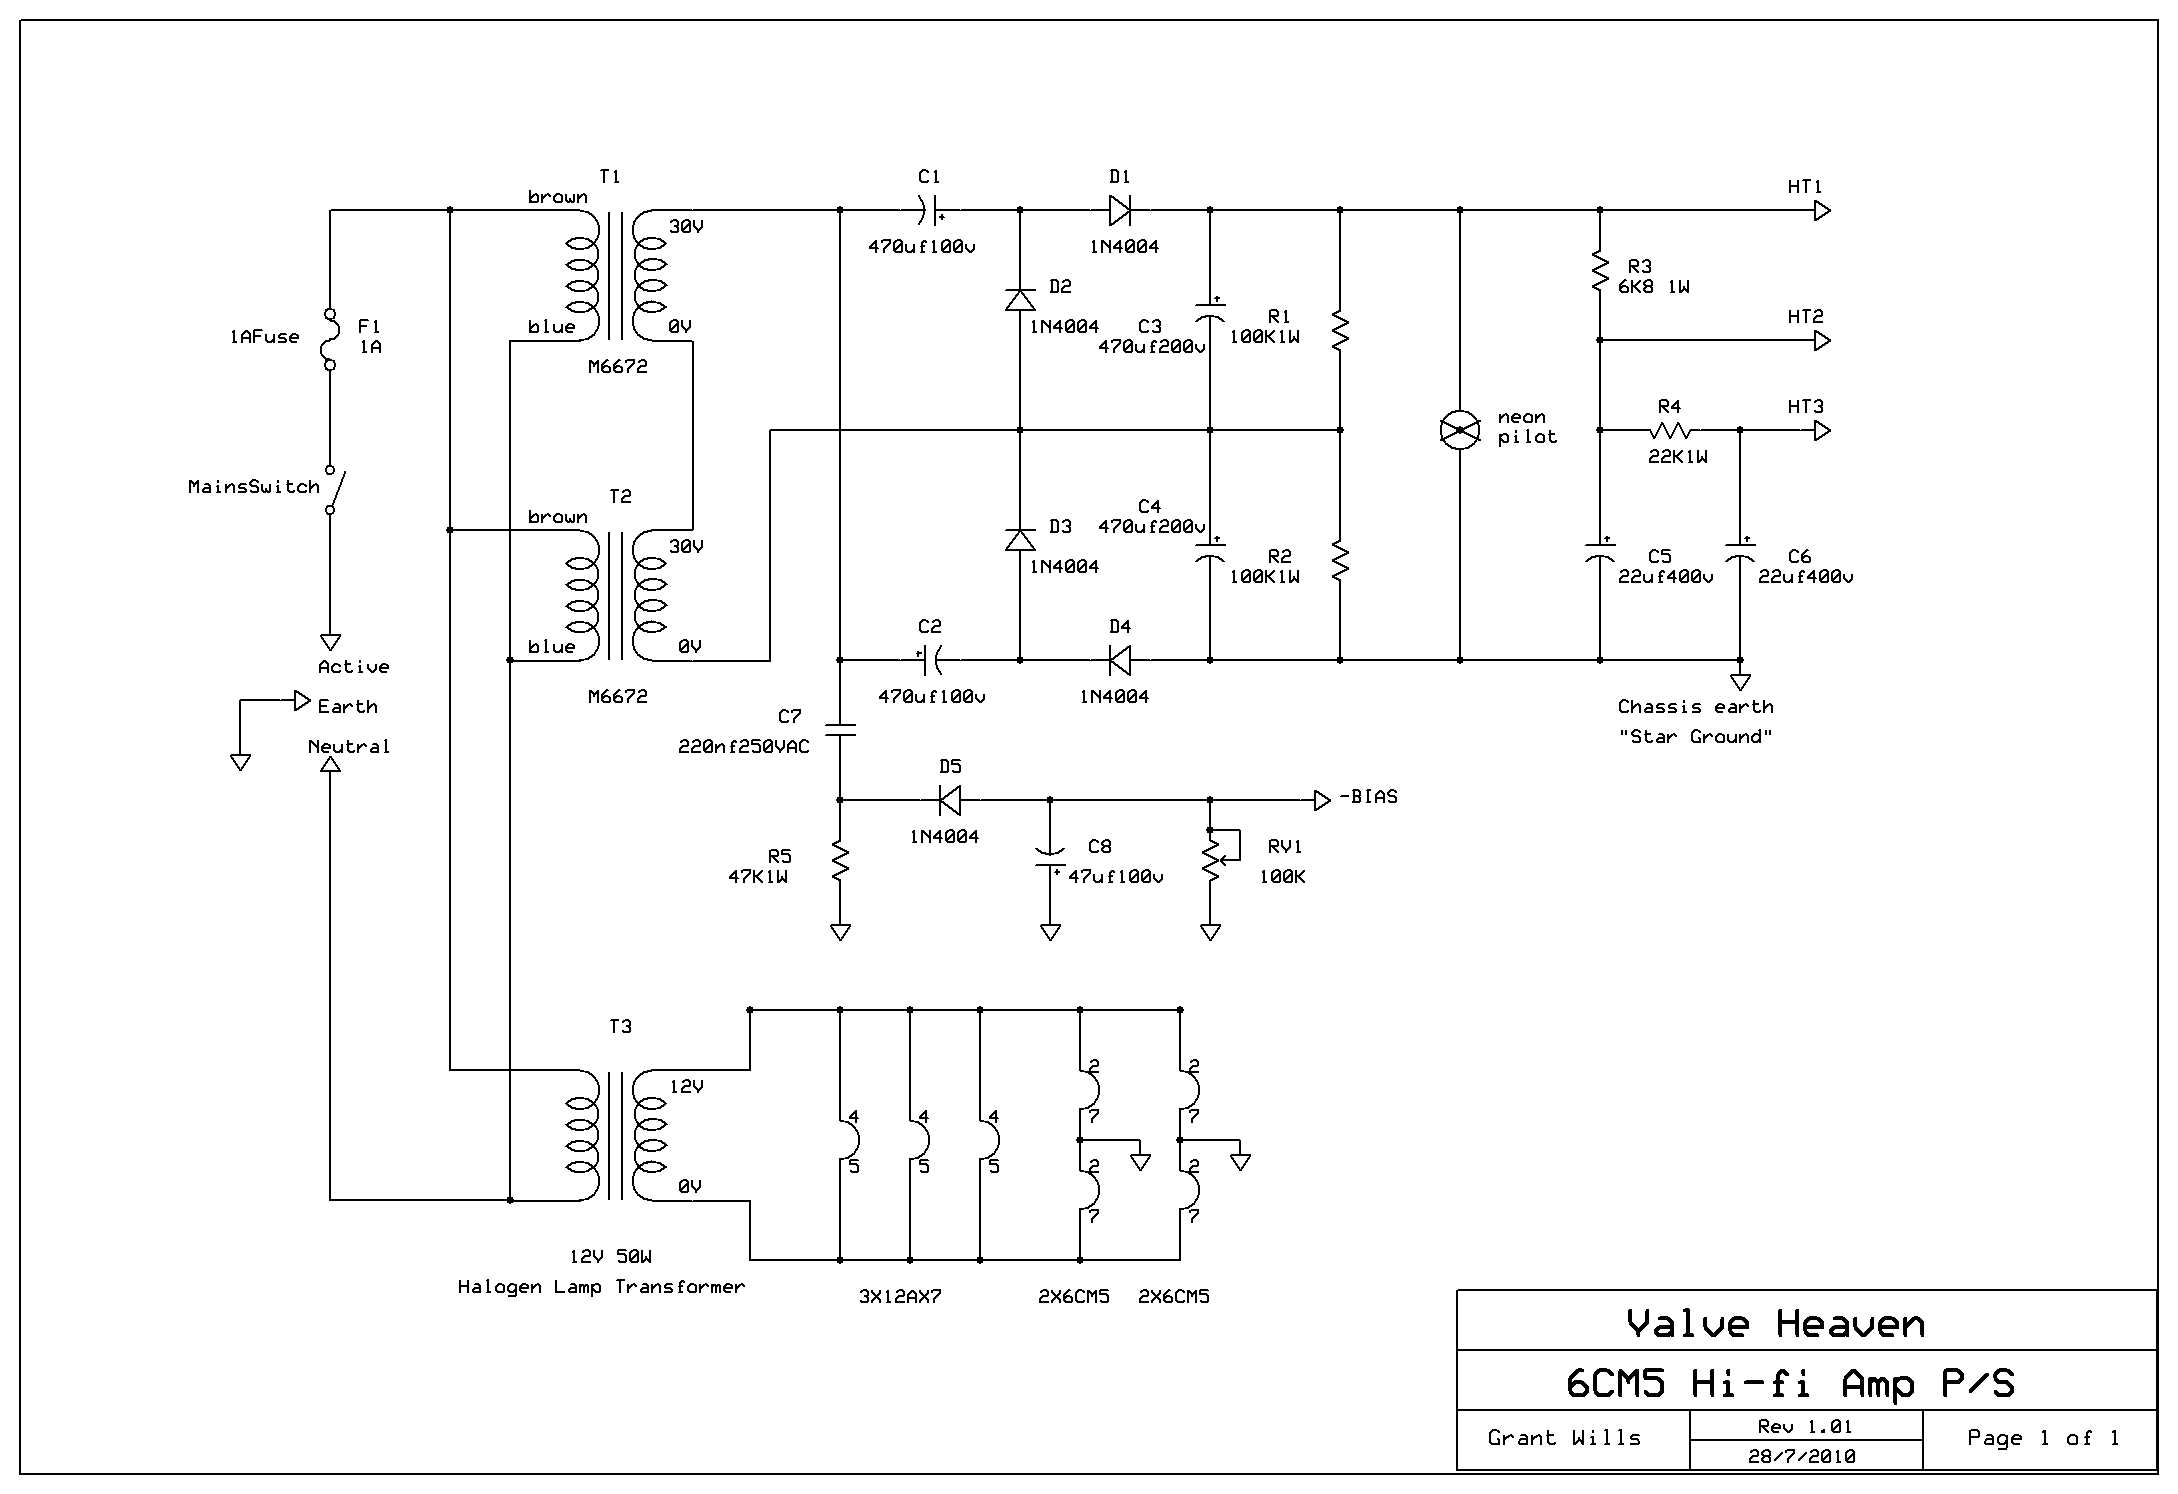
Since I developed this amplifier, I have received many requests for an alternative power supply for the amp. The original used an old TV power transformer which is not available any more and so I looked at an alternative power supply using similar voltage multipliers to my Lamington designs. Here is a schematic for an updated version of the power supply adapted to use currently available transformers here in Australia. Click on it for full size.

6CM5 Hi-fi PS


A new 2W low power amp design

I have just finished prototyping a new 2W Valve Heaven amp design called the “Lamington Junior”. I’m pretty pleased with it, as the design has been a long time in development. The design brief was for a low power amp that delivered a significant amount of clean, “chimey” headroom and also a great overdrive tone which is what it delivers! What is especially cool is that it runs from a 12V AC plugpack, so a newcomer to amp building can do so with no contact at all with the 240V mains making it a safer amp to build.

I am currently building a second prototype which will be easier to construct. I’ll soon have the design details including schematics available here at valveheaven.com. Soon to come will be construction manuals and kits for prospective builders.

Watch this space 😉

***UPDATE*** 13/1/2015  

Well, as promised, I have now posted the full design details and schematic diagram for the Lamington Junior here. I am very pleased with this amp, and it has now become a favourite here to play through at home, and I feel sure it will become as successful as its big brother, the Lamington 🙂

I will be making full kits and a construction manual for this amplifier available early Feb 2015 for $195 plus post for the DIY kit and $49 plus post for the DIY manual. Kits and the construction manual are now available.

***UPDATE*** 16/2/15

Several Lamington Junior kits have now been purchased with the builders very happy with their new amp. I just received this email from a customer who had never constructed an electronic project before:

Hi Grant,  I finally got it working (1k8 was in the wrong spot), all good. Thanks for your help, I will play with this one for a while and then i will try the Lamington 15w. Since I have no previous electronic experience I found the whole kit very easy to follow as a beginner. Thanks again!