In Part 1, we looked at the physics of how a valve is constructed and how it operates. In this session, we will look at a simple valve amplification stage – typical of one pre-amplifier stage in a guitar amplifier.
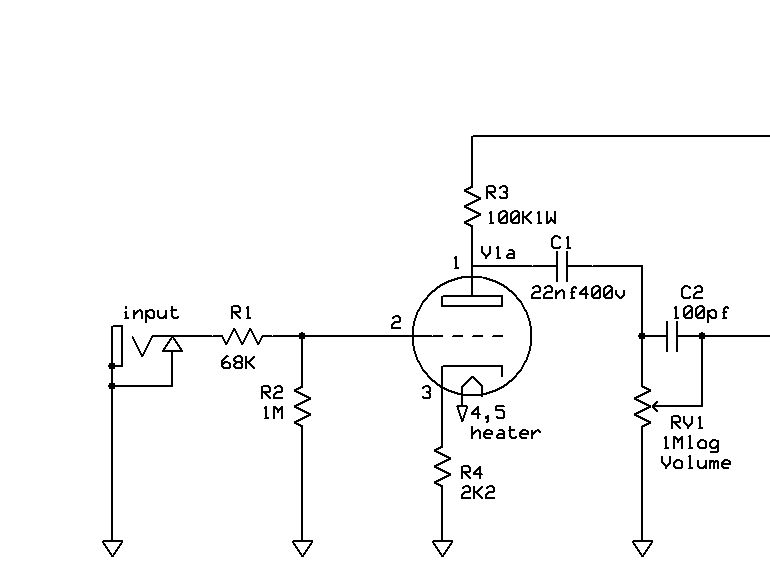
For illustration, here is a diagram of the input stage of one of my Lamington amplifiers:
You can see here in this circuit diagram the triode valve (cathode (pin3), grid (pin2) and anode (pin1)) wired in such a way that this stage provides gain (read an increase, or amplification of the input signal).
We saw in part one that a small change in voltage at the grid results in a greater change in electron flow (current) through the valve from the cathode to the anode. We also used the analogy of a valve being like a tap controlling the flow of water through a hose. For a valve to function correctly, it needs to be “biased” at a certain current (flow of electrons) through the valve. To use the tap analogy, this is like setting the tap at halfway between off and on. To “bias” a valve, we need to set up the circuit so that there is a certain voltage between the grid and cathode. This “bias” voltage will be different for different valve types. In this preamplifier stage, the bias is set up by placing a smaller resistor (R4 in this circuit) so that a small voltage is developed across it which provides the bias. This form of bias is called cathode bias.
Getting back to the operation of the preamp stage, you can see that a guitar is connected to the grid via R1 and R2. The signal from the guitar controls the flow of electrons through the valve causing a larger signal voltage to be developed at the anode of the valve. This increased (amplified) signal is fed through C1 to the volume control and then to the next stage of the amplifier.
That’s probably quite a bit to be digested at this point, but I hope that it is helpful and clear. I welcome any questions or comments below!
More to come!
